Filter lens analysis 1

This picture was a test picture. I was testing to see how to blur the filters and focus on the background. I took this picture as a test but when I saw it, it was amazing. The filters fit into the picture, the two filters goes well together and it easy to see the different with or without filters.
Development

The picture at the bottom is the
edited version. What I did to make the picture stand out was increase the
brightness and the contrast so that you can see the sky and the clouds
perfectly, played around with the levels to see which is the best fit, making
the colour brighter using the vibrancy and the curves and for the finish touch,
I played around with the colours to see if I could make it more better and to
control the brighter colour because too much bright colour can destroy the
picture.
During the trip, I did some
experiment with the filters.
What I did was place a filter right in front of
the lens to see if the filter makes the picture better. The other experiment I
did was holding one filter in front to see if the filter fits in the picture
well and to see if the filter makes the picture better. I did this so that when
I hold the two filters in front of the camera, I know that these two filters
makes the picture better. You can see the filter test picture on the next page
and you can see the other filter test on the previous slide.
The picture is taken around 7
o'clock sunset. I used a tripod to hold my camera and steady my camera so that
I could you one hand to hold the filters and the other hand to focus the
camera. The two filter in the picture are ND2 and 4. These two filters were
chosen to be in front of the camera because these two filters make the picture
better and they are the right brightness.
What went well in this picture is
that I have used Brian's idea in this in this picture. This shows that I have
understood Brian’s idea.
EBI: try to take the same picture
without the other side of the building showing.
Filter lens analysis 2

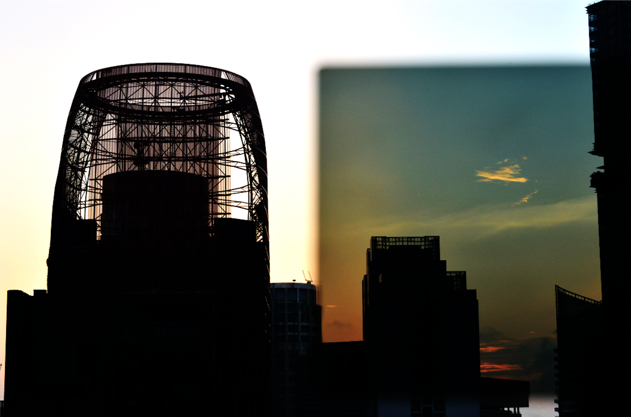
This picture is though my window. I woke up around 6 sunrise so that I could take a picture of the city with the sunrise. I use a ND4 filter in this picture. The filter is placed on the side of the camera because I want the viewers to see the difference between the filter and without the filter. With the filter, the sunrise colour really stand out and makes the coloured seen. Without the filter, the sky are too bright and the cloud can’t be seen because the sky's too bright.

Filter lens analysis 2

This picture is though my window. I woke up around 6 sunrise so that I could take a picture of the city with the sunrise. I use a ND4 filter in this picture. The filter is placed on the side of the camera because I want the viewers to see the difference between the filter and without the filter. With the filter, the sunrise colour really stand out and makes the coloured seen. Without the filter, the sky are too bright and the cloud can’t be seen because the sky's too bright.
I use the sunrise to lighten the building up. With the filter is much more effective than without.
What I did to make this picture much better is increase the brightness and contrast and also played around with the levels. This makes the picture much more effective because it make the colours of the sunrise stand out and brighter. It make the building unseen and the cloud is seen well.
To make this picture much more better I could place the filter in the middle of the picture to make it interesting. What is good about this picture is that it stand out and the filter is inside the picture and it make the picture looks goo. So I have used Rich McCor idea in my picture which is what I wanted. I used a tripod to hold my camera so that I could focus my camera and hold the filter. During the weekends and school days, I have been experimenting with different filter holds to see which one is effective and which one make the picture look better. The filters are ND2,3,4,6 and 8.
Filter lens 3 analysis


Filter lens 3 analysis

This picture is base on the filter
lens idea which came from Brian Carey. This picture is taken in Singapore by me
during the holidays. The building is the artscience museum which is one of the famous
buildings in Singapore.the idea that I am trying to achieve in this
picture was placing a filter in front of the building so that it would look
like the building is in the filter. Also I wanted to make the building standout
by decreasing the brightness using the filter so that the outside is bright and what's though the filter is little bit dim and that the building looks odd. I use the
bright sun to brighten the place so that the picture will standout. I have been
trying different filter hold to see which filter hold is the best and
effective.
This hold that I use in the picture wasn't the effective one but it
did made this picture look amazing and really made it standout. The most
effective one was the hold that I use for the picture at the bottom. It is
effective because it doesn't block the background and the place. The picture at
the top has one of the worse hold because it's blocking the background and it's
blocking the Marina Bay Sands which was the best building in singapore.

WWW: I have used Brian
Carey idea in my pictures. I have also found the most effective hold. I have
taking a picture that has good quality and it really stands out.
EBI: Try to use an effective filter
hold in a picture.
No comments:
Post a Comment